Monday, December 29, 2014

The Ugly Table Makeover

Earlier I wrote about my recent love affair with chalk paint. As promised, here's a look at the newly transformed console table. It took on a whole new personality when it was treated to a couple of coats of turquoise blue chalk finish paint by Decoart!

This console table, a thrift store bargain at just $1.50, looks nothing like it used to.

I bought this table for just $1.50 at a thrift store. In its original state it was pretty darned hideous. Its dark stained finish was dull, battered and gouged. One side panel featured two faux drawers with pulls, but the single real drawer that belonged between the fake ones was missing altogether, leaving a gaping hole. In such bad condition it rightfully belonged in a landfill.


The thrift store manager seemed desperate to get this eyesore, tagged at $5.00, out of his inventory. He practically begged me to take it, offering to drop the price to $1.50 the moment I glanced in the table's direction. He stood there hopefully as I mulled this over. Despite its appearance, the table was reasonably solid. And all four legs were still intact. Hmmmm....So I pulled the $1.50 out of my purse and took possession of what was probably one of the ugliest pieces of furniture in North Georgia.

When I got it home, Hubs took one look, rolled his eyes in disbelief, and asked how much they had paid me to get it off their premises.

I should have taken a "before" picture and posted it but quite honestly I was embarrassed to, it was just that awful looking. And I was even more embarrassed to admit that after I brought it home, I placed it behind the sofa in the living room with every intention of starting the rehab right away. (Pigs would fly first. I should have known better.)

Meanwhile, I hid the worst of the blemishes on its surface with a big decorative birdcage and a pair of candlestick lamps. Positioned between the sofa and the wall, the table's faults were less noticeable. Whenever company was expected, I shrouded the whole thing under a table cloth and prayed our cats wouldn't stage a big reveal.

This, I am ashamed to say, went on for almost nine years.

Then last month, a dear friend contacted me to say she and her honey wanted to come visit us. That spurred the long-deferred renovation of a third bedroom-turned-junkroom. There wasn't time to shop for new furniture, so I decided to tackle the table makeover at the same time we painted the ceiling and walls and laid new flooring.

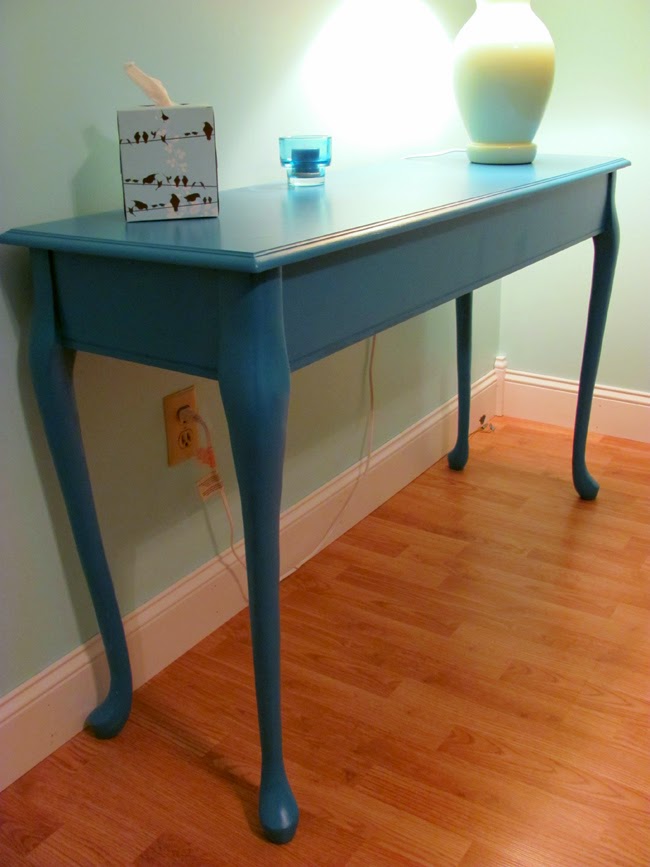
And so, with two coats of Decoart's chalk finish paint followed by two coats of satin varnish, the beat-up console table finally began its new life as a pretty and functional accent piece in our newly remodeled guestroom. There, it's on full display holding a lamp and other items. The side with the missing drawer faces the wall at present, but I'm hoping to persuade Hubs to replace it.

Like a pound rescue, the table has proven more than worthy of being given a second chance. Every time I look at it I'm really glad I bought it. It was a pretty good investment, I think.

Have you ever used chalk paint to rescue a thrift store find? How did it turn out? I'd LOVE to hear all about it!

Text and images ©2014 Lynn Edwards


Sunday, December 28, 2014

A Thought for Sunday, December 28, 2014

"One of the illusions of life is that the present hour is not the critical, decisive hour. Write it on your heart that every day is the best day of the year." -- Ralph Waldo Emerson

Sunday, December 21, 2014

A Thought for Sunday, December 21, 2014

"If you are yourself at peace, then there is at least some peace in the world. Then share your peace with everyone, and everyone will be at peace." -- Thomas Merton

Wednesday, December 17, 2014

Chalk One Up! I Love this New Paint!

A desire to update our massive, dark, ugly stone fireplace has led me to a great discovery: chalk paint! It started when I did an Internet search for ways to give a dated fireplace a new look. Short of having our fireplace torn out and replaced at a cost of several thousand dollars, I wanted something that would be (a) inexpensive, (b) relatively easy to do and (c) would be acceptable to Hubs. His typically masculine preference for decor that's dark and woodsy has frequently clashed with my preference for decor that's light, bright and white.

This photo of our fireplace at Christmastime was taken several years ago. The sheer scale of it and the huge expanse of dark stone overpowers the small room. Replacing this hulking monster simply isn't practical. Instead, I intend to apply a chalk paint wash in a light neutral color to lighten its appearance and integrate it visually with the rest of the decor.
I found the ideal solution when I came across a great tutorial on Erin Anderson's lovely blog. Erin treated her natural stone fireplace to a wash of Annie Sloan Chalk Paint mixed with water in a 1:3 ratio. Her now-updated fireplace has the same look I'm hoping to duplicate: lighter in tone, and refined rather than rustic.

My fireplace at present could be described as "Adirondack run amuck." It's 12 feet long, 8 feet high, and totally overwhelms its surroundings. It would fit right in at a hunting lodge, but in our house it's the proverbial elephant -- or should I say moose?? -- in the living room.

Anyway, when I saw the photos Erin posted of her fireplace makeover, I decided I just HAD to get my hands on some chalk paint. I had never heard of chalk paint before, but it intrigued me for several reasons. First, it needs NO prepping: no sanding, no primer, just a clean surface. The surface can be wood, metal, glass, ceramic, stone ... darned near anything. It yields a beautiful "soft" appearance, can be distressed if desired, and it comes in a wide range of decorator colors. It looked fantastic on Erin's fireplace. But before taking a plunge of similar magnitude I wanted to try it out on something small first, just to see what it was like to work with.

Annie Sloan Chalk Paint seems to be the best known brand, but at this time it's available in a limited number of retail locations and by mail order only. Being impatient, I didn't want to wait for a mail delivery, and I didn't have time to drive into the city to visit the nearest stockist, as retailers carrying the line are called.

Another Internet search led me to Decor Chalky Finish Paint from DecoArt Americana, which is sold at Hobby Lobby and a number of other retailers. So I promptly drove to a nearby Hobby Lobby and bought an 8 ounce jar of it in a beautiful turquoise color for $8.99. I have no way of comparing it to Annie Sloan's, but I'd like to give hers a try in the future.

My first try was on a wooden mug rack I found earlier this year in a thrift shop. The Decor formulation glided onto it as smooth as butter. It reminded me of painting with pastels, a medium often described as "sensual." Truly, this paint is sensual also. It delivered a wonderfully rich, matte appearance, transforming that nondescript mug rack into a good looking accent piece. Cleanup was a piece of cake: soap and water and done. Love it, love it, love it!

One 8 ounce jar of this stuff covers 60 square feet, according to the label. So now I'm painting a console table with it. I'm not done yet, but already I can tell my tired looking table is going to look sensational when it's finished. And after the holidays I'll take on the fireplace. Using a color other than turquoise, of course! :) So stay tuned -- I'll be posting pics soon.

©2014 Lynn Edwards

Sunday, December 14, 2014

A Thought for Sunday, December 14

"I still find each day too short for all the thoughts I want to think, all the walks I want to take, all the books I want to read, and all the friends I want to see. The longer I live, the more my mind dwells upon the beauty and the wonder of the world." -- John Burroughs

Saturday, December 13, 2014

A Super Fast, Super Easy Last Minute Gift Idea

Who doesn't need a quick and easy way to whip up a last minute holiday gift? Here's a great present you can make in minutes and spare yourself a trip to the mall:


These are original Artist Trading Cards which, when matted, will delight anyone on your gift list. Make some up for your childrens' teachers, your neighbors, your boss, your dog walker...or that impossible-to-buy-for person who has everything. They're suitable for everyone, and creating them is easy! Here's how:

Supplies needed:
Blank Artist Trading Cards
Found papers such as sheet music or dictionary pages
Color pencils
Acrylic matte medium or acrylic soft gel medium
Stamp pad with permanent archival ink in black or dark brown (black is shown here)
Rubber stamps with leaf designs
Iridescent gold acrylic paint
Stencil brush
8x10" mats  with openings sized for Artist Trading Cards

Step 1: 
Trim the found papers to the same size as the blank Artist Trading Cards.
Step 2: 
Using the matte medium or soft gel, adhere the found papers to the blank Artist Trading Cards. The found paper will be your background.
Step 3:
Apply ink to one of the rubber stamps and stamp the image onto one of the found paper backgrounds. Repeat, using the other stamp on the other background. Let the ink dry before proceeding.
Step 4:
Add colors to the leaves using the color pencils.
Step 5:
Load the stencil brush with a small amount of the iridescent gold paint. Dab off all but a tiny amount on a paper towel. Apply the remaining gold paint to the area surrounding the leaf images in a dabbing or pouncing motion using a very light touch. Allow to dry.
Step 6:
Insert each card into a mat (I buy mine from Jerry's Artarama) and you have a fine gift all ready to give!

Text and images © 2014 Lynn Edwards

Sunday, December 7, 2014

A Thought for Sunday, December 7, 2014

"Everything comes to us that belongs to us if we create the capacity to receive it." -- Rabindranath Tagore

Friday, December 5, 2014

Creating a Welcoming Holiday Entry on the Cheap

It has been crazy busy around here the past few weeks. With company from out of state arriving at Christmas, Hubs and I are racing against the clock to get the house in order.

Naturally we want our home to be nicely decorated for our guests' arrival. And that includes spiffing up the front porch. I already had a pair of wreaths and a door swag on hand in shades of silver, turquoise, lime green and magenta. (These colors work well with the house's body color and the blue-green front door.) I also had a pair of small artificial trees to position on each side of the front door. Hubs had strung white fairy lights in the trees several years ago but we had never decorated them beyond that. This time I wanted to decorate them to coordinate with the swag and wreaths, but I wanted to do it on the cheap!


The biggest problem with these trees was that their ugly, square plastic bases were 12 inches in diameter. That made it hard to find pots large enough to hold them that didn't cost the earth. None of the clay pots we had on hand were the right size. We looked at planters at Home Depot, which had some square ones at $15 each that would have worked, but I wasn't excited about spending $30 for them. Alternatively, I considered getting matching cardboard boxes and spray painting or wrapping them in decorative paper, but rejected the idea because the cardboard wouldn't have held up well if it rained or snowed.

Then Hubs discovered two old fruit baskets down in the basement. Turned out they were just the right size. All they needed was a coat of paint to make them look good. I handed him a can of Wal-Mart's el cheapo white spray paint -- it only runs about $3 per can -- and he went to work on the baskets. Bingo! (By the way, this paint is now my go-to for anything wood or metal, interior and exterior, that I want to paint white. It has a nice matte finish and it works GREAT!!!)

The next task was finding a way to anchor the trees so they wouldn't blow over in the wind. Two sacks of white marble chips at $3 each from Home Depot solved that problem nicely. We nestled an old 4 inch bed riser beneath each tree to support it, then filled in around the riser and up to the basket rim with the snowy white chips. The effect is perfect --- very "wintery!"


Next, a trip to Family Dollar and Big Lots yielded silver garlands, ornaments in silver, turquoise and lime green, and an assortment of lacy white snowflakes. All together they were $22. So including the marble chips, our total expenditure was a thrifty $11 per tree! Another plus: all the tree decorations are plastic, so they should last for years.

I think the baskets look so compatible with our farmhouse style home I've decided to leave them, minus the trees, in place year round. They'll make good supports for pots of ferns or flowers in the spring and summer, and I can display pumpkins and gourds on them in the fall. By tucking dried florist's moss in and around them to conceal the chips, the moss will give displays in those seasons a more earthy look. I can dress the baskets up even more by wrapping them with ribbon in seasonal colors, too.

Of course, the baskets will probably deteriorate over time, but even so, I figure that will take quite a while --several seasons at least. Meantime I'm so pleased with how this project turned out. We now have a welcoming holiday entry, and it cost hardly anything to create!

Text and images ©2014 Lynn Edwards