 |
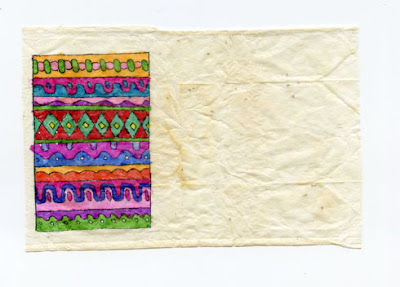
| My first ever attempt at making tea bag art. The design was created with Sharpie markers. ©2018 Lynn Edwards |
Interesting Looks
I like how the color tends to collect in the creases, and the interesting stains of color that appear randomly here and there. The tea bag paper above isn't especially colorful; I deliberately chose it for my Sharpie drawing to avoid having the marker colors skewed by an underlying hue. Contrast that paper to the one below, made by steeping two Wild Raspberry Hibiscus tea bags from Stash Tea together in a single cup:Tea Bags' Many Uses
Okay, you're saying, but exactly how do you go about using these tea bags in artwork? Answer: they can be used on their own to make miniature paintings (Etsy has a number of tea bag artists working in miniature scale.). Or, they can be incorporated into larger works by adhering them with an appropriate glue or medium. I've also seen installation art created entirely from tea bags. They can also be used to decorate lampshades and made into purses, among many other things.
There are any number of ways to embellish these tiny beauties: for example you can draw on them with markers, as I've done here. You can also paint on them with acrylics or watercolors. You can stitch on them; stamp or stencil them; glue on embellishments such as ribbons, buttons or charms; collage other papers over them, or use them to "veil" a photo or area in a larger work...basically, whatever your imagination dreams up. Tea bags are surprisingly sturdy, but they aren't indestructible. To avoid tearing them I don't recommend using anything sharp or heavy on them, but if you do want to tear them, the ragged edges can add a intriguing look to a project.
How to Prepare Them
Preparing tea bags for use in art is easy:
1. Brew a cup of tea, using one or two tea bags depending on how strong you want it. Steep for five minutes with the cup covered.
2. Remove the tea bag(s) and place them on a saucer to cool.
3. Park yourself in a comfy chair and enjoy your cup of tea.
4. When the tea bags are cool enough to handle, gently squeeze out as much liquid as you can from them.
5. Allow the bag and its contents to dry thoroughly. (I very gently separate the two sections of the bag to allow for better air flow, and place the tea bag on its side on a clean, dry paper towel.) Depending on temperature and humidity levels, the drying process can take from one to three days.
6. When the bag's contents are completely dry, remove the tiny staple at the top edge of the bag. To do this I VERY CAREFULLY use the tip of an old steak knife to pry open the staple, if there is one. Discard the staple, string and tag.
7. Empty out the dry tea leaves. Add them to your garden, where they will help enrich and condition the soil.
8. Very gently part the "seam" where the edges of the paper meet and slide your finger along the seam to open the bag all the way.
9. Remove any remaining leaf residue by rubbing the paper with your finger.
10. Flatten the paper, if desired, by ironing it between two pieces of parchment paper. Use low heat and turn the steam setting to OFF. Your tea bag is now ready to become art! 😊
I recommend designating one tea bag as a sacrificial "test" tea bag on which you can try out whatever medium you wish to use. For example, I discovered certain Sharpie colors tend to bleed profusely on the porous tea bag paper so I avoid using those colors.
To see more tea bag art, take a look at Pinterest's "tea bag art" section, or do a Google search using that search term or similar terms.
Text and images ©2018 Lynn Edwards

No comments:
Post a Comment