Showing posts with label Weldbond glue. Show all posts

Wednesday, March 19, 2014

How to Make a Basic Painted Paper Bead

When you know how to make a basic painted paper bead you'll be able to create an endless number of jewelry pieces to compliment any outfit. This tutorial will have you making your own beads in no time. It will show you how to make a two-color bead in black and metallic silver like the one in this photo:

A basic painted paper bead
Of course you can adapt these instructions to use any colors you wish.


 Let's get started!

 Your first step is to gather the materials. To make one bead you'll need:

(1) piece of plain white lightweight paper such as photocopy paper
(1) piece of  white cardstock
Permanent black ink pad
Rubber stamp with small-scale design (Mine is from Judikins)
Toothpick
Bead roller (mine was purchased on  Etsy)
X-acto knife and cutting mat OR scissors and paper cutter
Ruler
Glue (I use WeldBond Glue but Yes!Glue, Elmer's Original Glue or acrylic soft gel can also be used)
Small flat paintbrushes, 1/4" wide and 1/8" wide
Masking tape
Iridescent Silver acrylic paint
Carbon Black acrylic paint
Gloss acrylic varnish


Instructions:

Make the base bead

1. Using the paper cutter, or the X-acto knife and a cutting mat, cut a 3/4" wide strip of paper from the piece of white cardstock:

I used a Fiskar paper cutter to trim off a 3/4" wide strip which forms the base bead.
2. Now trim the length of the strip to 7 1/2."

3. Place one short end of the 7 1/2" strip into the slot on the bead roller. Make one or two turns with the roller, keeping the edges of the cardstock aligned.

4. Place a drop of glue on the cardstock to secure the paper. Roll the bead into a tight cylinder, using additional drops of glue every now and then as you roll to secure it.

Keep the edges of the cardstock aligned as you roll the base bead.
5. Cover the final half-inch of the cardstock with glue using the 1/4" flat brush. Press to adhere, making sure the trimmed end is smoothly glued down.

A base bead finished and ready for a layer of painted paper.

Make the painted paper.

1. Using the Iridescent Silver acrylic paint, apply a coat or two to one side of the photocopy paper. Make sure your coverage is even and there are no streaks. Allow to dry thoroughly. (Depending on how many beads you plan to make, you can cut the photocopy paper down to a smaller size before painting it. The piece I used, shown here, is about 6x6".)


2. When the paint is dry, stamp your design onto it with permanent black ink. (Alternately, you could hand paint a design. Just be sure you keep the design small in scale.) Here I've used a Judikins rubber stamp featuring small alphabetical marks from an ancient language.

3. Allow the ink to dry thoroughly. In my humid climate this can take as long as an hour.

4. Cut a strip 3/4" wide from the painted paper, just as you did for the cardstock.

5. Trim off a piece that's just long enough to wrap around the base bead with little or no overlap. I try to cut precisely enough so the two ends butt snugly together with no gaps between them.
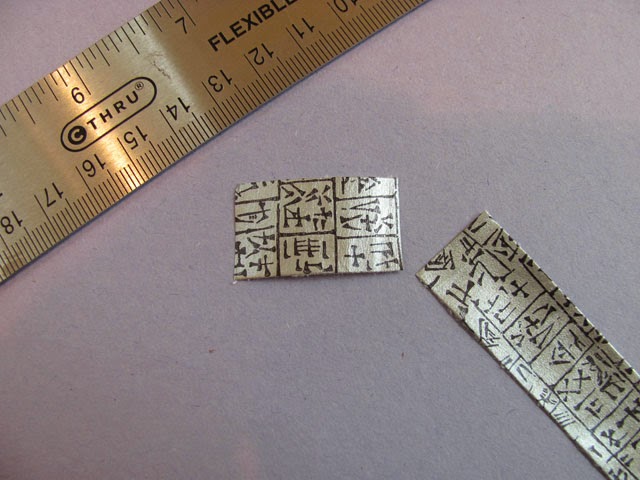


6. Glue the painted strip onto the base bead, keeping the edges aligned:


7. Wrap a small piece of tape around the toothpick just below the center. This creates a "stop" that keeps the bead from sliding down onto your fingers as you paint it. Place the bead on the toothpick:


8. Holding the bead upright, paint one end of the bead with Carbon Black acrylic paint using the 1/8" flat paintbrush. Let dry. Turn the bead over and paint the other end. Let dry.

9. Apply a couple of coats of clear acrylic varnish, allowing each coat to dry thoroughly between applications.


You now have a beautiful hand painted bead, ready to string!

Text and images ©2014 Lynn Edwards

Saturday, January 18, 2014

Making an Asian Style Paper Bead

Recently I gave myself a challenge: find ways to make unusual paper beads. Emphasis on unusual. This is how my mind works. Take a good idea and try to make it better. In this case I was after bead designs that were out of the ordinary.

After playing around with various concepts, I came up with some beads that don't look much like standard paper beads, which are often rolled from magazine photos or calendar images cut into elongated triangles. Not that there's anything wrong with beads made that way. Heck, one of my very favorite necklaces is constructed with beads made from a photo from an art magazine. I wear it proudly and often. It never fails to elicit oohs and aahs.

But I wanted to come up with beads whose construction and visual appearance were altogether different from the much-loved rolled paper style. Here's the first of my many experiments:

About 3/4 " in length, this Asian themed bead features tiny calligraphic symbols and floral Origami paper.

Asian Style Beads

This bead was the first design I came up with. A vintage "found" Japanese engineering manual whose pages were filled with tiny calligraphic symbols inspired the Asian motif. Floral-themed Origami paper in red, green and gold made the perfect compliment.

Here's how I made it:

1. First I made a rolled paper cylinder out of black acid free card stock to serve as the base.

2. Next I cut a strip of paper from the engineering manual. The calligraphy symbols had been printed in vertical, columnar format. I was careful to cut so all of the calligraphy remained intact.

3. After determining the length of the calligraphy strip needed to go around the base, I marked the dimensions in pencil and cut two out.

 4. Using Weldbond glue, I glued on the calligraphy paper over the black base, placing the calligraphy paper flush with the ends. (Using ModPodge as the glue would have been ok, too.)

5. I then measured and cut a length of Origami paper and glued it between the calligraphy papers. I left just a tiny bit of the black base showing in between the paper strips for interest.

6. After the glue was completely dry, I encased my Asian themed bead in gloss finish ModPodge, then applied acrylic gloss varnish.

I really liked the way this design turned out so I made up several more beads to use them in a necklace. At a local arts and crafts store I found a set of red and black round glass beads that look great with the paper beads. Their shape reminds me of Japanese paper lanterns. Together they'll make a beautiful pairing that will look stunning worn with a black, red or ivory color sweater or top.

These paper beads are considerably more time consuming to make but I think the effort is worth it.

I'll be using this design concept in future projects because it lends itself to endless variations. In my next post, though, I'll be featuring a second bead design that's sure to get your creative energy going as it inspires you to pick up your pen or brush. Intrigued? Watch for it here on the blog next week.

Text and image ©2014 Lynn Edwards