Ooops, my bad! I forgot to include the use of acrylic glazing liquid in my list of ways to keep acrylics workable longer (see my post dated 11/19/15.) Glazing liquid is a real workhorse in the studio. The basis for mixing glazes -- thin applications of transparent colors over previously painted surfaces -- it's formulated to keep acrylic paint "open" long enough to cover those surfaces so that the glaze goes on smoothly and doesn't dry too quickly. But it can also be added to paints on the palette to slow down their drying time. While glazing liquid won't keep paint workable as long as Open Medium does, it does extend their working time and makes blending easier.
©2015 Lynn Edwards
Showing posts with label acrylic paint. Show all posts
Showing posts with label acrylic paint. Show all posts
Sunday, November 22, 2015


Saturday, July 4, 2015
Painting Up a Storm
I have a thing for painting everything in sight: woodwork, bookcases, decor accents, furniture -- you name it. My mother is the same way, so I guess the apple falls not far from the tree. So enamored we are of transforming our respective home environs with paint that we've been nicknamed "The Krylon Girls" by other members of the family.
These past three months there have been a number of painting projects on my agenda as Hubs and I had the exterior of the house landscaped, and then had our screened porch converted into a three season room. All this home improvement had me doing lots of painting, since I'm a terrible perfectionist who'd rather go for a root canal than sub out the work to someone else. (None of these projects included the paintings in various stages of completion in my studio, mind you. Those are in a different category altogether, and do not involve latex paint!)
Anyway, here are just a few of the projects that have kept me busy for the past several weeks -- and somewhat neglectful of updating this blog:
Oh, and I also completely repainted all of the woodwork on the porch in advance of the enclosure installation. But I'm not done yet! Still on my to-do list is repainting a glass top table that we're using for dining out on the porch. Meals taken out there are delightful, but I will enjoy them even more when I can treat that table to a lovely coat of fresh white paint!
Text and images ©2015 Lynn Edwards
These past three months there have been a number of painting projects on my agenda as Hubs and I had the exterior of the house landscaped, and then had our screened porch converted into a three season room. All this home improvement had me doing lots of painting, since I'm a terrible perfectionist who'd rather go for a root canal than sub out the work to someone else. (None of these projects included the paintings in various stages of completion in my studio, mind you. Those are in a different category altogether, and do not involve latex paint!)
Anyway, here are just a few of the projects that have kept me busy for the past several weeks -- and somewhat neglectful of updating this blog:
 |
| Remember these?? I wasn't sure how I'd use them until.... |
 |
| It occurred to me they'd do a good job camouflaging an old utility box that was a real eyesore. |
 | ||
| I painted this adorable little table that we inherited from my hubby's grandmother. Originally stained dark brown with a broken top, it now does colorful duty as an accent table on the sunporch. I also painted the old carpenter's bench in front of the wicker sofa. It makes a nice coffee table. |
 |
| This chair and another just like it were being used in the breakfast room, but now the pair has been moved out to the sunporch and given a new look, below.... |
 |
| I had just barely enough fabric left over from the sofa cushions to recover the two chair seats. |
 |
| Another chair, found at a thrift shop, received a coat of bright lime green paint. The woven seat was falling apart so I turned it into a planter that sits in front of my studio. Love that lime green and purple combo! |
Oh, and I also completely repainted all of the woodwork on the porch in advance of the enclosure installation. But I'm not done yet! Still on my to-do list is repainting a glass top table that we're using for dining out on the porch. Meals taken out there are delightful, but I will enjoy them even more when I can treat that table to a lovely coat of fresh white paint!
Text and images ©2015 Lynn Edwards
Tuesday, March 3, 2015
How to Extend Regular Acrylics' Working Time
 |
| Golden's Open Acrylic Medium |
Those of you who read my blog regularly know I'm always looking for ways to get maximum use from my art supplies. And you also know how much I love acrylic paints.
Both "regular" and fluid acrylics dry fast, sometimes too fast, particularly in arid climates with low humidity. (Just try using them for plein air work and you'll see what I mean.)
A few years ago, Golden Paints introduced a great new product line: Golden Open Acrylics. These acrylics handle just like regular acrylics but they stay wet much, much longer. Days longer, in many cases.
If I had a fairy godmother, I'd ask her to transform all my "regular" acrylics into Open Acrylics. But I don't have a fairy godmother. And if you're familiar with Golden's paints, you know they don't come cheap. But there IS a way to enjoy a longer working time without ditching your regular acrylics: just buy a bottle of Open Medium. Add a few drops of it to "regular" acrylics and -- glitter dust, please!!! -- you've got acrylic paints that stay workable significantly longer!
I haven't conducted scientific tests to determine exactly how much longer, but I can say using Open Medium has resulted in an extended working time I didn't have before. My palette is a piece of heavy 4 mil plastic so my paints are probably drying on it faster than they would on my Sta-Wet palette, but they're still considerably wetter an hour or two later than paints not amended with the medium. If I used the Sta-Wet, I bet they'd be viable forever. (I'm exaggerating, of course. But I suspect a month or two would not be unreasonable to expect.)
Open Medium has come in really handy for monoprinting with my Gelli Plate. It allows time to develop surface designs, making printing sessions more leisurely. It also makes blending colors a piece of cake, along with any number of other uses. For students just learning to paint with acrylics, it reduces the frustration many feel when their paints dry faster than they can be manipulated.
Open Medium is now an indispensable tool in my studio. If I were painting plein air I would not leave home without it.
By the way, I am in no way compensated by Golden nor do I have any business relationship with that company. I just happen to like their products!
Text and image ©2015 Lynn Edwards
Wednesday, June 25, 2014
Upcycling a Thrift Store Find with Paper Mosaics
A few weeks ago I was cruising my favorite thrift store when I spotted some small framed mirrors. There were six of them, all identical to each other. Their 11 inch square, plain black frames were perfectly flat. Their backs still bore Ikea labels. Surprisingly, they were in very good shape despite having been tossed haphazardly into a bin. I snapped up three of them then and there but now regret not buying the entire lot when I had the chance. At just $1.51 each they were bargains!
From the minute I saw them I knew they'd be ideal candidates for a makeover with paper mosaics. I've just completed the first of the three, shown below:
A paper mosaic treatment is a great way to update an old, shabby or dated-looking thrift store find. Or that beat up piece of furniture that's been languishing for years in your garage. Whether you call it upcycling, rescuing or rehabbing, the end result is spectacular. All it takes is patience, a variety of papers, decoupage medium, a flat artist's brush, a ruler, scissors or a paper cutter, paper towel or a soft cloth, and a utility knife or X-acto knife.
Here's how, step by step:
1. Clean the surface of the item to be covered to remove all traces of dust and dirt.
2. You may have to scuff a slick surface with sandpaper to provide some "tooth." If so, remove any sanding dust before proceeding.
3. Cut your papers into strips. The strips can be all the same width, as on the mirror above (mine were all one inch wide) or they can be cut to different widths. The length of the strips can vary according to your preference, but it's easier to work with short strips rather than long ones. The length of the longest strip on my mirror was four inches.
4. Try out various color and pattern combinations to see how they look together. You can plan your arrangement out in advance (take a picture with your cell phone to help you remember where things go). Or you can just wing it. I chose to wing it.
5. Apply decoupage medium (my preference was Modge Podge) evenly to the back of a paper strip and press it onto the surface. Smooth out any air bubbles. If excess medium oozes out from underneath, gently blot it up with a slightly dampened cloth or paper towel.
6. Continue adding paper strips as above, positioning them snugly against one another until the surface is completely covered with the paper "tiles." Allow to dry for at least 24 hours (it can take longer in very humid conditions for it to dry completely).
7. Trim excess paper from edges. For the mirror, I placed it face down on a cutting mat and trimmed off excess paper with an X-acto knife with a sharp, brand new blade.
8. Apply another coat of decoupage medium to the surface. Allow to dry thoroughly.
9. Apply one or more coats of acrylic varnish to help protect the surface from dust, fingerprints and scratches. Allow each coat to dry thoroughly before applying the next coat.
Tips:
Use papers of a similar thickness for a nice smooth finish. Text weight papers are easiest to work with.
A paper cutter makes cutting the strips go much easier and faster. Be sure to use a fresh new blade!
For a different but equally appealing look, you can paint the item in a single color first using acrylic or latex paint, then apply the paper strips, leaving small gaps between them.
Text and images ©2014 Lynn Edwards
From the minute I saw them I knew they'd be ideal candidates for a makeover with paper mosaics. I've just completed the first of the three, shown below:
 |
| Paper "tiles" in shades of blue, blue green, violet, and yellow green revive this thrift store mirror. To avoid reflections while photographing it I temporarily covered the mirror area with black card stock. |
 |
| Will I put it in my Etsy shop or keep it? I haven't decided yet. |
A paper mosaic treatment is a great way to update an old, shabby or dated-looking thrift store find. Or that beat up piece of furniture that's been languishing for years in your garage. Whether you call it upcycling, rescuing or rehabbing, the end result is spectacular. All it takes is patience, a variety of papers, decoupage medium, a flat artist's brush, a ruler, scissors or a paper cutter, paper towel or a soft cloth, and a utility knife or X-acto knife.
Here's how, step by step:
1. Clean the surface of the item to be covered to remove all traces of dust and dirt.
2. You may have to scuff a slick surface with sandpaper to provide some "tooth." If so, remove any sanding dust before proceeding.
3. Cut your papers into strips. The strips can be all the same width, as on the mirror above (mine were all one inch wide) or they can be cut to different widths. The length of the strips can vary according to your preference, but it's easier to work with short strips rather than long ones. The length of the longest strip on my mirror was four inches.
4. Try out various color and pattern combinations to see how they look together. You can plan your arrangement out in advance (take a picture with your cell phone to help you remember where things go). Or you can just wing it. I chose to wing it.
5. Apply decoupage medium (my preference was Modge Podge) evenly to the back of a paper strip and press it onto the surface. Smooth out any air bubbles. If excess medium oozes out from underneath, gently blot it up with a slightly dampened cloth or paper towel.
6. Continue adding paper strips as above, positioning them snugly against one another until the surface is completely covered with the paper "tiles." Allow to dry for at least 24 hours (it can take longer in very humid conditions for it to dry completely).
7. Trim excess paper from edges. For the mirror, I placed it face down on a cutting mat and trimmed off excess paper with an X-acto knife with a sharp, brand new blade.
8. Apply another coat of decoupage medium to the surface. Allow to dry thoroughly.
9. Apply one or more coats of acrylic varnish to help protect the surface from dust, fingerprints and scratches. Allow each coat to dry thoroughly before applying the next coat.
Tips:
Use papers of a similar thickness for a nice smooth finish. Text weight papers are easiest to work with.
A paper cutter makes cutting the strips go much easier and faster. Be sure to use a fresh new blade!
For a different but equally appealing look, you can paint the item in a single color first using acrylic or latex paint, then apply the paper strips, leaving small gaps between them.
Text and images ©2014 Lynn Edwards
Sunday, June 22, 2014
Making Handmade Business Cards
Recently I came across an intriguing project: making handmade business cards. I found it in Roxanne Padgett's fine book Acrylic Techniques in Mixed Media: Layer, Scribble, Stencil, Stamp. This appealed to me, so I gathered up a few supplies supplies and got ready to play.
The idea is to take a sheet of paper such as heavy card stock or
watercolor paper and proceed to paint, collage, stamp and/or otherwise
express yourself in various ways, then cut it into 2 x 3 1/2
inch pieces -- the dimensions for a standard business card. Apply a
computer label printed with your contact information to the back of
the card and you have a tiny work of art a recipient will be
unlikely to discard. As an alternative to using labels you could simply print or write
your contact info on the back if you have good penmanship.
The first batch I made up (two in shades of violet and blue-green are shown in the photo's upper left hand corner) feature collage, but for subsequent batches I used paint only. I applied it in several ways, including washes, stenciling and stamping.
All told I ended up with 25 handmade business cards. I worked on 140 lb. watercolor paper (cut roughly to 8x10 inches) using a different palette of colors for each. Sure, it was more time consuming than ordering business cards on the Internet, but I found that creating the handmade cards was just as enjoyable as creating small paintings. So I feel like the investment of my time was worth it. Leftover scraps that weren't large enough to make a card with, I turned into bookmarks.
Have you ever made your own business cards from original art? If so, let's hear from you. Tell us what techniques you used to make them or how you've promoted your art with them. What has been recipients' reactions to them? Include an image of your handiwork and I'll happily post it here on the blog for all to admire and enjoy.
Text and image ©2014 Lynn Edwards
 |
| Some of the handmade, hand painted business cards I made this past week. |
Distinguish yourself
It's probably not feasible to make these cards in huge quantities, but it's nice to be able to hand one to someone you hope to make a lasting and favorable impression upon: a prospective collector, a journalist who's interviewing you, or a gallery director, perhaps. Receiving a piece of original art from the individual who made it automatically sets that artist apart from the crowd.The first batch I made up (two in shades of violet and blue-green are shown in the photo's upper left hand corner) feature collage, but for subsequent batches I used paint only. I applied it in several ways, including washes, stenciling and stamping.
Fun Foam is FUN!
One of the most enjoyable aspects of this project was creating three small stamps using fun foam, which is readily available at craft stores. If you haven't tried this product yet you don't know how much fun you're missing. Fun foam cuts easily with scissors. The fun foam I used has adhesive on one side. Just cut out your design, press it onto a piece of mat board and you're ready to go. One design turned out so well I'm thinking of having it made into a mounted rubber stamp.It's like making paintings
All told I ended up with 25 handmade business cards. I worked on 140 lb. watercolor paper (cut roughly to 8x10 inches) using a different palette of colors for each. Sure, it was more time consuming than ordering business cards on the Internet, but I found that creating the handmade cards was just as enjoyable as creating small paintings. So I feel like the investment of my time was worth it. Leftover scraps that weren't large enough to make a card with, I turned into bookmarks.
Have you ever made your own business cards from original art? If so, let's hear from you. Tell us what techniques you used to make them or how you've promoted your art with them. What has been recipients' reactions to them? Include an image of your handiwork and I'll happily post it here on the blog for all to admire and enjoy.
Text and image ©2014 Lynn Edwards
Wednesday, March 19, 2014
How to Make a Basic Painted Paper Bead
When you know how to make a basic painted paper bead you'll be able to create an endless number of jewelry pieces to compliment any outfit. This tutorial will have you making your own beads in no time. It will show you how to make a two-color bead in black and metallic silver like the one in this photo:
Of course you can adapt these instructions to use any colors you wish.
Let's get started!
Your first step is to gather the materials. To make one bead you'll need:
(1) piece of plain white lightweight paper such as photocopy paper
(1) piece of white cardstock
Permanent black ink pad
Rubber stamp with small-scale design (Mine is from Judikins)
Toothpick
Bead roller (mine was purchased on Etsy)
X-acto knife and cutting mat OR scissors and paper cutter
Ruler
Glue (I use WeldBond Glue but Yes!Glue, Elmer's Original Glue or acrylic soft gel can also be used)
Small flat paintbrushes, 1/4" wide and 1/8" wide
Masking tape
Iridescent Silver acrylic paint
Carbon Black acrylic paint
Gloss acrylic varnish
2. Now trim the length of the strip to 7 1/2."
3. Place one short end of the 7 1/2" strip into the slot on the bead roller. Make one or two turns with the roller, keeping the edges of the cardstock aligned.
4. Place a drop of glue on the cardstock to secure the paper. Roll the bead into a tight cylinder, using additional drops of glue every now and then as you roll to secure it.
5. Cover the final half-inch of the cardstock with glue using the 1/4" flat brush. Press to adhere, making sure the trimmed end is smoothly glued down.

2. When the paint is dry, stamp your design onto it with permanent black ink. (Alternately, you could hand paint a design. Just be sure you keep the design small in scale.) Here I've used a Judikins rubber stamp featuring small alphabetical marks from an ancient language.
3. Allow the ink to dry thoroughly. In my humid climate this can take as long as an hour.
4. Cut a strip 3/4" wide from the painted paper, just as you did for the cardstock.
5. Trim off a piece that's just long enough to wrap around the base bead with little or no overlap. I try to cut precisely enough so the two ends butt snugly together with no gaps between them.
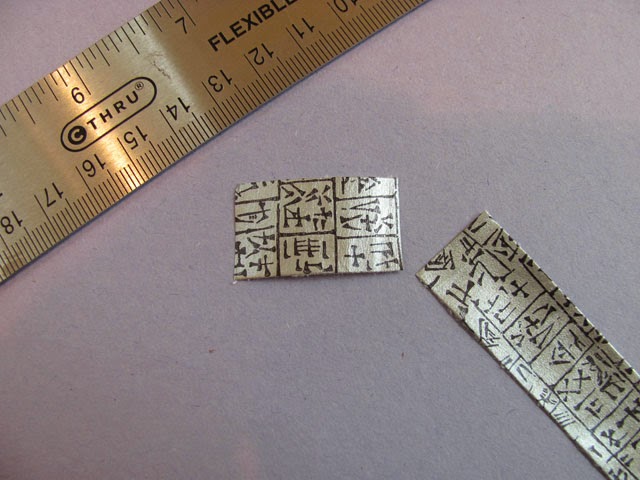
6. Glue the painted strip onto the base bead, keeping the edges aligned:

7. Wrap a small piece of tape around the toothpick just below the center. This creates a "stop" that keeps the bead from sliding down onto your fingers as you paint it. Place the bead on the toothpick:

8. Holding the bead upright, paint one end of the bead with Carbon Black acrylic paint using the 1/8" flat paintbrush. Let dry. Turn the bead over and paint the other end. Let dry.
9. Apply a couple of coats of clear acrylic varnish, allowing each coat to dry thoroughly between applications.

Text and images ©2014 Lynn Edwards
 |
| A basic painted paper bead |
Let's get started!
Your first step is to gather the materials. To make one bead you'll need:
(1) piece of plain white lightweight paper such as photocopy paper
(1) piece of white cardstock
Permanent black ink pad
Rubber stamp with small-scale design (Mine is from Judikins)
Toothpick
Bead roller (mine was purchased on Etsy)
X-acto knife and cutting mat OR scissors and paper cutter
Ruler
Glue (I use WeldBond Glue but Yes!Glue, Elmer's Original Glue or acrylic soft gel can also be used)
Small flat paintbrushes, 1/4" wide and 1/8" wide
Masking tape
Iridescent Silver acrylic paint
Carbon Black acrylic paint
Gloss acrylic varnish
Instructions:
Make the base bead
1. Using the paper cutter, or the X-acto knife and a cutting mat, cut a 3/4" wide strip of paper from the piece of white cardstock: |
| I used a Fiskar paper cutter to trim off a 3/4" wide strip which forms the base bead. |
3. Place one short end of the 7 1/2" strip into the slot on the bead roller. Make one or two turns with the roller, keeping the edges of the cardstock aligned.
4. Place a drop of glue on the cardstock to secure the paper. Roll the bead into a tight cylinder, using additional drops of glue every now and then as you roll to secure it.
 |
| Keep the edges of the cardstock aligned as you roll the base bead. |
 |
| A base bead finished and ready for a layer of painted paper. |
Make the painted paper.
1. Using the Iridescent Silver acrylic paint, apply a coat or two to one side of the photocopy paper. Make sure your coverage is even and there are no streaks. Allow to dry thoroughly. (Depending on how many beads you plan to make, you can cut the photocopy paper down to a smaller size before painting it. The piece I used, shown here, is about 6x6".)2. When the paint is dry, stamp your design onto it with permanent black ink. (Alternately, you could hand paint a design. Just be sure you keep the design small in scale.) Here I've used a Judikins rubber stamp featuring small alphabetical marks from an ancient language.
3. Allow the ink to dry thoroughly. In my humid climate this can take as long as an hour.
4. Cut a strip 3/4" wide from the painted paper, just as you did for the cardstock.
5. Trim off a piece that's just long enough to wrap around the base bead with little or no overlap. I try to cut precisely enough so the two ends butt snugly together with no gaps between them.
6. Glue the painted strip onto the base bead, keeping the edges aligned:
7. Wrap a small piece of tape around the toothpick just below the center. This creates a "stop" that keeps the bead from sliding down onto your fingers as you paint it. Place the bead on the toothpick:
8. Holding the bead upright, paint one end of the bead with Carbon Black acrylic paint using the 1/8" flat paintbrush. Let dry. Turn the bead over and paint the other end. Let dry.
9. Apply a couple of coats of clear acrylic varnish, allowing each coat to dry thoroughly between applications.
You now have a beautiful hand painted bead, ready to string!
Text and images ©2014 Lynn Edwards
Monday, March 17, 2014
How to Alter a Fabric Bead
Happy St. Patrick's Day!
Today we begin a series of posts to show you several ways of making your own beads. For our first post in this series, I'll be showing you how to take an existing fabric bead and changing its look entirely.
Why alter a bead after it has been created? There are lots of reasons. Maybe you don't particularly like the looks of it. Maybe you no longer wear the outfit the beads were made to match. Maybe your taste has changed and you want a completely different fashion look. Maybe you'd prefer to upcycle rather than discard.
In my case, I had a couple of surplus beads left over from this necklace project, below:
I was thinking it would be fun to experiment with ways to alter fabric beads, a topic I've not seen discussed before. The surplus beads presented a good opportunity to try out my makeover ideas.
Paint would be my "magic wand" in this little venture. The fabric I originally used to make the beads was a finely woven cotton so I knew it would absorb acrylic paint readily. For the makeover I wanted to go dramatically glitzy with a gold and black color scheme.
This is what the fabric bead, identical to those in the jewelry shown above, looks like after its makeover:
Here's how to give a fabric bead a whole new personality:
1. Start with a bead made from a single layer of fabric adhered to a rolled paper base. To make handling it easier, slide it onto a wooden toothpick with a "stop" made from a snippet of masking tape wrapped around the toothpick. The stop keeps the bead from sliding around and keeps paint off your fingers.
2. Holding the toothpick upright and using a small flat brush, apply a coat of bright Iridescent Gold fluid acrylic paint to the middle part of the bead. When it's completely dry apply a second coat. (If using regular, heavy bodied acrylic, thin it with just a bit of water so it's the consistency of heavy cream. This helps the paint soak into the fabric.)
3. When the gold paint is dry, use a small flat brush to apply Carbon Black acrylic paint to both ends of the bead.*
4. With a small liner or rigger brush loaded with Carbon Black, make tiny squiggly marks randomly on the middle part of the bead with just the tip of the brush. Or, if you prefer a different design, you could make dots, stripes...any pattern you'd like. Let dry.
5. Seal your bead with a coat or two of clear acrylic varnish.When the varnish dries, your made-over bead is ready to string.
*You don't have to use the same colors I've used. Use different colors, or a variety of colors if you'd prefer. Just be sure to use opaque paints. Transparent paints won't cover the bead's original design.
That's it for now. Have a great St. Patrick's Day! Saol fada chugat! which, in Gaelic, is "Long life to you!"
©2014 Lynn Edwards
Today we begin a series of posts to show you several ways of making your own beads. For our first post in this series, I'll be showing you how to take an existing fabric bead and changing its look entirely.
Why alter a bead after it has been created? There are lots of reasons. Maybe you don't particularly like the looks of it. Maybe you no longer wear the outfit the beads were made to match. Maybe your taste has changed and you want a completely different fashion look. Maybe you'd prefer to upcycle rather than discard.
In my case, I had a couple of surplus beads left over from this necklace project, below:
 |
| A couple of fabric beads like the blue and green bead above were left over from this necklace project. These extras were good candidates for a bead makeover. Notice I'm featuring a necklace that's perfect to wear on St. Patrick's Day, complete with Celtic spirals! |
Paint would be my "magic wand" in this little venture. The fabric I originally used to make the beads was a finely woven cotton so I knew it would absorb acrylic paint readily. For the makeover I wanted to go dramatically glitzy with a gold and black color scheme.
This is what the fabric bead, identical to those in the jewelry shown above, looks like after its makeover:
 |
| The bead sporting a whole new look. The fabric texture is now more noticeable, adding interest to its appearance. |
Here's how to give a fabric bead a whole new personality:
1. Start with a bead made from a single layer of fabric adhered to a rolled paper base. To make handling it easier, slide it onto a wooden toothpick with a "stop" made from a snippet of masking tape wrapped around the toothpick. The stop keeps the bead from sliding around and keeps paint off your fingers.
2. Holding the toothpick upright and using a small flat brush, apply a coat of bright Iridescent Gold fluid acrylic paint to the middle part of the bead. When it's completely dry apply a second coat. (If using regular, heavy bodied acrylic, thin it with just a bit of water so it's the consistency of heavy cream. This helps the paint soak into the fabric.)
3. When the gold paint is dry, use a small flat brush to apply Carbon Black acrylic paint to both ends of the bead.*
4. With a small liner or rigger brush loaded with Carbon Black, make tiny squiggly marks randomly on the middle part of the bead with just the tip of the brush. Or, if you prefer a different design, you could make dots, stripes...any pattern you'd like. Let dry.
5. Seal your bead with a coat or two of clear acrylic varnish.When the varnish dries, your made-over bead is ready to string.
*You don't have to use the same colors I've used. Use different colors, or a variety of colors if you'd prefer. Just be sure to use opaque paints. Transparent paints won't cover the bead's original design.
That's it for now. Have a great St. Patrick's Day! Saol fada chugat! which, in Gaelic, is "Long life to you!"
©2014 Lynn Edwards
Saturday, October 19, 2013
Glorious Santa Fe - Part 1
Hubby and I have just returned from a long-anticipated vacation in Santa Fe. It was our first visit to "The City Different" and it was fabulous! As an artist, to me it was like finding the Holy Grail. Art and culture are the very essence of Santa Fe. It's literally everywhere, from hand-painted window panes on charming adobes to its numerous outstanding art museums to the hundreds of galleries all around its beautiful Plaza and up and down its fabled Canyon Road. Everywhere you look, there's art -- paintings, sculptures, handcrafted jewelry, wearable art, hand tooled leather, museum quality beadwork...I could go on and on. Suffice it to say I was on Total Sensory Overload from the moment we stepped off the New Mexico Rail Runner, the commuter train connecting Albuquerque and Santa Fe, and caught whiffs of fragrant pinon pine scenting the cool night air.
We stayed in a delightful little inn, El Paradero, within walking distance of the Plaza at 220 W. Manhattan St. Having decided to go totally green on this venture and use nothing but our feet and public transportation to get around, the location was ideal. The walk to nearby restaurants, the Plaza and all of the surrounding attractions was easy. The only time we relied on vehicle transportation was to go to and from Canyon Road. We could have walked but because Canyon Road runs uphill and we're not exactly spring chickens, we opted to save our energy by taking the free shuttle.
Our innkeepers, Paul and Sue, have decorated all their guest rooms with hand painted motifs in keeping with the area's Spanish, Mexican and Native traditions. But my absolute favorite was the room in which we were served breakfast each morning, shown below:
Who says colors don't affect one's moods? There's no way a person could fail to start the day smiling when served breakfast in a room this upbeat!
And why live with plain glass panes when you can decorate a door like this?
I like this door and window treatment so much, I'm planning to paint designs on my French doors here at home. All it takes is a bit of acrylic paint, which is easily removed when you want to make changes to it. The light shining through the colors is beautiful, and if the design used is "open" enough, you can see through the glass to the view outside, while still enjoying some privacy. Painting glass panels will be much more fun than hanging curtains! Later I'll be posting a photo of my efforts, but in my next several posts, we'll be covering many more fascinating aspects of Santa Fe. Have you been there? If so, what was your favorite part of the trip? Leave your comments by clicking on the "Comments" link below.
By the way, here's what we saw when we looked out those same French doors earlier today. Now we've seen everything!!! No idea where it came from, but the little rascal has had a great time chowing down on the hostas. Is anyone missing a pig???
All text and images ©2013 Lynn Edwards
We stayed in a delightful little inn, El Paradero, within walking distance of the Plaza at 220 W. Manhattan St. Having decided to go totally green on this venture and use nothing but our feet and public transportation to get around, the location was ideal. The walk to nearby restaurants, the Plaza and all of the surrounding attractions was easy. The only time we relied on vehicle transportation was to go to and from Canyon Road. We could have walked but because Canyon Road runs uphill and we're not exactly spring chickens, we opted to save our energy by taking the free shuttle.
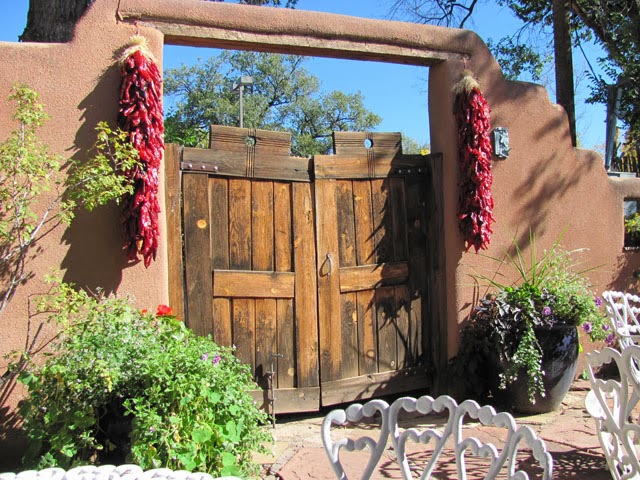 | |||
| El Paradero's courtyard gates, flanked by ristras -- strings of red chile peppers. Note New Mexico's famous turquoise sky in the background. It truly is that blue! |
 |
| Warm yellow walls, festive tablecloths and colorful pottery add cheer to El Paradero's sunny breakfast room. |
 |
| A fire burning in a hand painted kiva fireplace warmed the room on chilly mornings |
And why live with plain glass panes when you can decorate a door like this?
 | |||
| Hand painted designs brighten the entry to El Paradero's breakfast room. |
By the way, here's what we saw when we looked out those same French doors earlier today. Now we've seen everything!!! No idea where it came from, but the little rascal has had a great time chowing down on the hostas. Is anyone missing a pig???
 |
| Our unusual visitor. |
All text and images ©2013 Lynn Edwards
Monday, August 26, 2013
Painting an Artist Trading Card or ACEO with Sponges
Why is it the art I seem to be most satisfied with are the pieces created "off the cuff?" Yesterday was a good example. I had been dipping the ends of some fabric beads in iridescent silver paint. When I finished, there was about a teaspoon of paint left over.
I didn't want to toss it, or wipe it off onto the cloth I was using for a cleanup rag. Instead, I decided to see if I had an old or unfinished painting I could stamp onto with the silver paint. Maybe it could rekindle my enthusiasm for some orphaned project. So I went looking in my stash for a suitable piece to work with.
The perfect candidate turned out to be a 2 1/2x3 1/2" artist trading card my friend Rebecca Salcedo had given me a few years ago. Rebecca is both a decorative artist and a fine artist. She had been experimenting with faux paint treatments for a client's walls, and had created several of these little cards to test various effects and color combinations. One afternoon she had stuck her head in my studio door (at the time we were both tenants in a communal studio space), handed me two of the cards and said, "Here's something to start some tiny paintings with." Intending to do just that, I had placed them in a drawer. Where they languished until yesterday.
One of the cards featured a bit of texture on its surface. It was painted a mid-value grey, lightly glazed with what looked to be a mixture of Pthalo Blue and black, making it an ideal blank slate. Eureka! The leftover silver paint would look great with those colors. I got right to work.
Instead of a brush, I decided to use itty-bitty sponges. These were actually pieces of a large sponge I had previously cut up for another project. Back then I had used the pieces to stamp small squares onto a canvas. The biggest of the bunch was about the size of a thumbprint, the smallest about the circumference of my middle finger.
Painting with sponges was a way to leave my comfort zone and give something different a try. It's part of my New Studio Mantra: new digs call for exploring new directions. Since moving into my new space, I've been doing just that and having a ball, inspired in part by a book titled Mixed Media Revolution: Creative Ideas for Reusing Your Art by Darlene Olivia McElroy and Sandra Duran Wilson. Already Sandra and Darlene have led me down several new pathways to creative opportunity.
Doing this little sponge painting was great fun. I held no expectations for its outcome, just allowed myself to play and dabble. In addition to the Iridescent Silver, Carbon Black, Titanium White and Payne's Grey rounded out my palette. I learned quickly to use the very lightest of touches when applying the loaded sponge to the paper, or a big blob would result that had to be covered up. The sponges' textured surfaces created a delicate, yet intricate interplay of colors; layering and veiling and layering some more produced a remarkably detailed level of complexity my clumsy photography can't capture adequately here. Nor can it capture the luminous glow the metallic silver paint infuses.
As I worked on this I was fully in the Zone, dabbing away and enjoying every minute as the painting took shape. When I finished it, I noticed it looks equally good turned in any direction, and because the silver paint is reflective, each orientation looks very different from the others. It's like four unique little paintings in one!
©2013 Lynn Edwards
.
I didn't want to toss it, or wipe it off onto the cloth I was using for a cleanup rag. Instead, I decided to see if I had an old or unfinished painting I could stamp onto with the silver paint. Maybe it could rekindle my enthusiasm for some orphaned project. So I went looking in my stash for a suitable piece to work with.
The perfect candidate turned out to be a 2 1/2x3 1/2" artist trading card my friend Rebecca Salcedo had given me a few years ago. Rebecca is both a decorative artist and a fine artist. She had been experimenting with faux paint treatments for a client's walls, and had created several of these little cards to test various effects and color combinations. One afternoon she had stuck her head in my studio door (at the time we were both tenants in a communal studio space), handed me two of the cards and said, "Here's something to start some tiny paintings with." Intending to do just that, I had placed them in a drawer. Where they languished until yesterday.
One of the cards featured a bit of texture on its surface. It was painted a mid-value grey, lightly glazed with what looked to be a mixture of Pthalo Blue and black, making it an ideal blank slate. Eureka! The leftover silver paint would look great with those colors. I got right to work.
 |
| A 2 1/2x3 1/2" abstract, painted entirely with sponges. |
Instead of a brush, I decided to use itty-bitty sponges. These were actually pieces of a large sponge I had previously cut up for another project. Back then I had used the pieces to stamp small squares onto a canvas. The biggest of the bunch was about the size of a thumbprint, the smallest about the circumference of my middle finger.
Painting with sponges was a way to leave my comfort zone and give something different a try. It's part of my New Studio Mantra: new digs call for exploring new directions. Since moving into my new space, I've been doing just that and having a ball, inspired in part by a book titled Mixed Media Revolution: Creative Ideas for Reusing Your Art by Darlene Olivia McElroy and Sandra Duran Wilson. Already Sandra and Darlene have led me down several new pathways to creative opportunity.
Doing this little sponge painting was great fun. I held no expectations for its outcome, just allowed myself to play and dabble. In addition to the Iridescent Silver, Carbon Black, Titanium White and Payne's Grey rounded out my palette. I learned quickly to use the very lightest of touches when applying the loaded sponge to the paper, or a big blob would result that had to be covered up. The sponges' textured surfaces created a delicate, yet intricate interplay of colors; layering and veiling and layering some more produced a remarkably detailed level of complexity my clumsy photography can't capture adequately here. Nor can it capture the luminous glow the metallic silver paint infuses.
As I worked on this I was fully in the Zone, dabbing away and enjoying every minute as the painting took shape. When I finished it, I noticed it looks equally good turned in any direction, and because the silver paint is reflective, each orientation looks very different from the others. It's like four unique little paintings in one!
©2013 Lynn Edwards
.
Friday, August 23, 2013
Tips for Making Paper Beads
What started out as idle entertainment is now an obsession. To keep my muse from leaving on vacation while the studio was being built, I took up bead making, specifically, making beads from paper and fabric scraps. The materials were readily available and it was something I could do while watching TV in the evening. The simplicity of this activity appealed to me, as did the idea of turning commonplace materials into something attractive and useful. No special equipment was needed other than a ruler, scissors and glue.
Once I had the process down after considerable practice, I started thinking of ways to streamline the mechanics of rolling paper beads so the paper strips would stay centered, resulting in a nice, uniform bead. My bead making endeavor took a big leap forward when I discovered bead rollers while cruising Etsy. A bead roller is a simple hand held tool that grips one end of the paper and holds it in place so you have much better control of the paper as you roll it. (My bead rollers work only with paper. I continue to roll fabric beads entirely by hand. I'll cover making fabric beads in a future post.)
Once you start making paper beads, you become a paper addict. Suddenly you see anything made of paper in a whole new light! Can labels, candy wrappers, old stationery, gift wrap, advertising brochures, junk mail...everything that's paper becomes potential bead making fodder. The prospects are unlimited. But to expand my choices even further, I'm also hand painting my own papers using multiple layers of pattern and color. For these papers I use the same professional quality acrylics and permanent inks that I use for making fine art. The reason? The acrylic paints are the most heavily pigmented, most lightfast paints available, and the inks are equally stable. I'm using them so that the beads will look just as good years from now as they do today.
I've also adopted the practice of double coating the outer surface of each bead, particularly those printed from "found" materials, first with a clear acrylic isolation coat, followed by a polymer varnish with UV protection. The two products work in tandem to protect paper beads from fading, and the varnish provides additional protection from dirt and scratches.
Along the way, I've also made several discoveries through trial and error. I share them with you here:
1.The best looking beads have visual impact. Papers with colorful, complex patterns or images and those with high contrast graphics produce dramatic looking beads. A more understated look can be achieved by using papers with soft, blended colors.
2.A paper cutter can eliminate the tedium of cutting papers with a scissors. I spent about $17 on a Fiskar SureCut paper trimmer and love it. With it I can cut papers faster than the speed of light, and with accuracy, too. You can find these gadgets on Amazon, which is where I bought mine, or in arts and crafts stores.
3.Rushing things can ruin an otherwise well constructed bead. Allow beads to dry thoroughly in between applications of glue, medium and varnish.
4.A storage bin lets you dry many beads at the same time. Mine is an upcycled potato salad container with a couple inches of sand in it. (See photo below.) In place of sand you can use raw rice, dried beans or tiny pebbles. The beads are held upright in the sand on cotton swabs. I snip off one end of the swab to remove one of the cotton tips, but leave the other cotton tip in place because it makes the swab easy to grasp. My favorite bead roller creates a hole in the bead that's the exact diameter of the hollow plastic swabs I buy at Walgreens. So after I've rolled the bead, I carefully remove it from the bead roller and gently slide the bead onto the stick part of a swab. The cotton tip acts as a "handle" for the bead as liquid medium or varnish is applied. Then I push the trimmed end of the swab into the sand to hold the bead upright while it dries.
For beads with holes that are too large for cotton swabs, I use straws of a corresponding diameter. I cut the straws into 3" pieces and slide a bead onto each one. "Stops" made of masking tape wrapped around the straws, or rubber bands twisted onto the straws keep the beads from sliding downward.
Copyright 2013 Lynn Edwards
Once I had the process down after considerable practice, I started thinking of ways to streamline the mechanics of rolling paper beads so the paper strips would stay centered, resulting in a nice, uniform bead. My bead making endeavor took a big leap forward when I discovered bead rollers while cruising Etsy. A bead roller is a simple hand held tool that grips one end of the paper and holds it in place so you have much better control of the paper as you roll it. (My bead rollers work only with paper. I continue to roll fabric beads entirely by hand. I'll cover making fabric beads in a future post.)
Once you start making paper beads, you become a paper addict. Suddenly you see anything made of paper in a whole new light! Can labels, candy wrappers, old stationery, gift wrap, advertising brochures, junk mail...everything that's paper becomes potential bead making fodder. The prospects are unlimited. But to expand my choices even further, I'm also hand painting my own papers using multiple layers of pattern and color. For these papers I use the same professional quality acrylics and permanent inks that I use for making fine art. The reason? The acrylic paints are the most heavily pigmented, most lightfast paints available, and the inks are equally stable. I'm using them so that the beads will look just as good years from now as they do today.
I've also adopted the practice of double coating the outer surface of each bead, particularly those printed from "found" materials, first with a clear acrylic isolation coat, followed by a polymer varnish with UV protection. The two products work in tandem to protect paper beads from fading, and the varnish provides additional protection from dirt and scratches.
Along the way, I've also made several discoveries through trial and error. I share them with you here:
1.The best looking beads have visual impact. Papers with colorful, complex patterns or images and those with high contrast graphics produce dramatic looking beads. A more understated look can be achieved by using papers with soft, blended colors.
2.A paper cutter can eliminate the tedium of cutting papers with a scissors. I spent about $17 on a Fiskar SureCut paper trimmer and love it. With it I can cut papers faster than the speed of light, and with accuracy, too. You can find these gadgets on Amazon, which is where I bought mine, or in arts and crafts stores.
3.Rushing things can ruin an otherwise well constructed bead. Allow beads to dry thoroughly in between applications of glue, medium and varnish.
4.A storage bin lets you dry many beads at the same time. Mine is an upcycled potato salad container with a couple inches of sand in it. (See photo below.) In place of sand you can use raw rice, dried beans or tiny pebbles. The beads are held upright in the sand on cotton swabs. I snip off one end of the swab to remove one of the cotton tips, but leave the other cotton tip in place because it makes the swab easy to grasp. My favorite bead roller creates a hole in the bead that's the exact diameter of the hollow plastic swabs I buy at Walgreens. So after I've rolled the bead, I carefully remove it from the bead roller and gently slide the bead onto the stick part of a swab. The cotton tip acts as a "handle" for the bead as liquid medium or varnish is applied. Then I push the trimmed end of the swab into the sand to hold the bead upright while it dries.
 |
| Cotton tip swabs hold beads upright as they dry in a container filled with sand |
For beads with holes that are too large for cotton swabs, I use straws of a corresponding diameter. I cut the straws into 3" pieces and slide a bead onto each one. "Stops" made of masking tape wrapped around the straws, or rubber bands twisted onto the straws keep the beads from sliding downward.
Copyright 2013 Lynn Edwards
Subscribe to:
Posts (Atom)