Showing posts with label tutorial. Show all posts

Thursday, April 16, 2015

More Rainy Nights -- and Days -- in Georgia

Ethereal Trees - Blue              ©2015 Lynn Edwards

It's still raining here in the Peach State. The crummy weather has an upside, though: it has allowed me to get in even more studio time than usual. (I normally spend 20-30 hours per week painting.) With the weather being so bad I just don't want to go anywhere in the rain.

Since last weekend I've been reworking a 24 x 30 abstract (I wasn't satisfied with it so now I'm treating it to a major overhaul). Today I put the final brushstrokes on a nice 11x14 grid composition abstract in shades of blue, gray, black and white. And I've also begun some smaller works that will soon be listed in my Etsy shop.

And -- drum roll, please -- I've finally gotten around to figuring out how to use Daily Paintworks, and have uploaded several pieces to DPW's gallery. Much to my surprise and delight, DPW chose to feature one of them, Ethereal Trees - Blue, shown above, on its Facebook page yesterday as one of its Top 10 picks!

My relationship with computers has been like a bad marriage: more unpleasant than happy. The desire to avoid frustration is why I kept putting off familiarizing myself with DPW for over a year. I was equally intimidated by all the changes and new features at Artspan, my web site's host service. But my web site desperately needs updating. With several more days of rain predicted, I'm going to tackle it this coming weekend. I'm hoping the updating process won't be any more difficult than learning to navigate my way through DPW was.

DPW is wonderfully easy to use. They have a new member's start up tutorial that spells out, step by step, exactly how to do everything without tearing your hair out. It's actually written in plain English! No geek-speak! If all tutorials were this comprehensive yet simple to grasp, computer-challenged people like myself would be in hog's heaven. So kudos to the design folks at DPW! If I could I would send you a dozen roses. Not because DPW chose to honor one of my paintings, but because you've made using your service such a pleasure. For me, that's even better than a sunny day!

©2015 Lynn Edwards


Tuesday, March 25, 2014

Bead Making How-to's Will Resume Soon

Are you wondering if our bead making how-to's have ended? I can reassure you they have not. The past few days have been crazy hectic. I just haven't had time to put together another tutorial. Instead I've been working to photograph all the jewelry I've made for my Etsy shop's upcoming opening. There are 30 pieces, each requiring 4 or 5 different product shots. That's 120-150 photos, most of which must then be tweaked and resized in PhotoShop Elements before they can be uploaded.. This chore has kept me plenty busy. But tomorrow, instead of shooting jewelry, I plan to remedy the tutorial shortage. So check back again in the next few days.

What you'll find will be a step-by-step for making multicolored, gilded eye candy. These little numbers are loaded with wow factor yet the technique for making them is as easy as making a PB&J sandwich. And you can do it with just four "ingredients," all of which you probably already have. Would I kid you? No way. Stay tuned!

©2014 Lynn Edwards

Wednesday, March 19, 2014

How to Make a Basic Painted Paper Bead

When you know how to make a basic painted paper bead you'll be able to create an endless number of jewelry pieces to compliment any outfit. This tutorial will have you making your own beads in no time. It will show you how to make a two-color bead in black and metallic silver like the one in this photo:

A basic painted paper bead
Of course you can adapt these instructions to use any colors you wish.


 Let's get started!

 Your first step is to gather the materials. To make one bead you'll need:

(1) piece of plain white lightweight paper such as photocopy paper
(1) piece of  white cardstock
Permanent black ink pad
Rubber stamp with small-scale design (Mine is from Judikins)
Toothpick
Bead roller (mine was purchased on  Etsy)
X-acto knife and cutting mat OR scissors and paper cutter
Ruler
Glue (I use WeldBond Glue but Yes!Glue, Elmer's Original Glue or acrylic soft gel can also be used)
Small flat paintbrushes, 1/4" wide and 1/8" wide
Masking tape
Iridescent Silver acrylic paint
Carbon Black acrylic paint
Gloss acrylic varnish


Instructions:

Make the base bead

1. Using the paper cutter, or the X-acto knife and a cutting mat, cut a 3/4" wide strip of paper from the piece of white cardstock:

I used a Fiskar paper cutter to trim off a 3/4" wide strip which forms the base bead.
2. Now trim the length of the strip to 7 1/2."

3. Place one short end of the 7 1/2" strip into the slot on the bead roller. Make one or two turns with the roller, keeping the edges of the cardstock aligned.

4. Place a drop of glue on the cardstock to secure the paper. Roll the bead into a tight cylinder, using additional drops of glue every now and then as you roll to secure it.

Keep the edges of the cardstock aligned as you roll the base bead.
5. Cover the final half-inch of the cardstock with glue using the 1/4" flat brush. Press to adhere, making sure the trimmed end is smoothly glued down.

A base bead finished and ready for a layer of painted paper.

Make the painted paper.

1. Using the Iridescent Silver acrylic paint, apply a coat or two to one side of the photocopy paper. Make sure your coverage is even and there are no streaks. Allow to dry thoroughly. (Depending on how many beads you plan to make, you can cut the photocopy paper down to a smaller size before painting it. The piece I used, shown here, is about 6x6".)


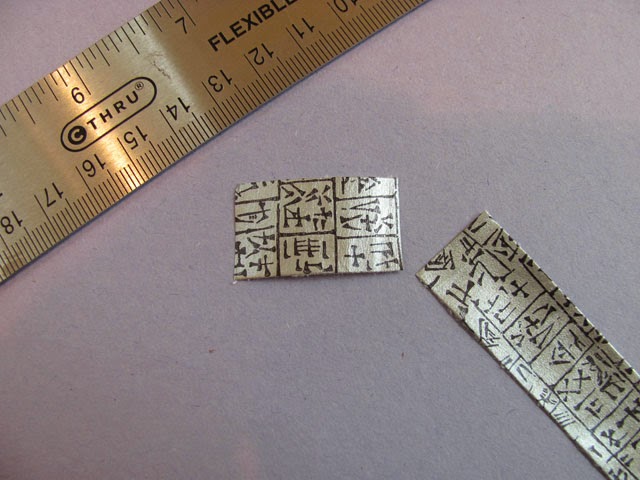
2. When the paint is dry, stamp your design onto it with permanent black ink. (Alternately, you could hand paint a design. Just be sure you keep the design small in scale.) Here I've used a Judikins rubber stamp featuring small alphabetical marks from an ancient language.

3. Allow the ink to dry thoroughly. In my humid climate this can take as long as an hour.

4. Cut a strip 3/4" wide from the painted paper, just as you did for the cardstock.

5. Trim off a piece that's just long enough to wrap around the base bead with little or no overlap. I try to cut precisely enough so the two ends butt snugly together with no gaps between them.


6. Glue the painted strip onto the base bead, keeping the edges aligned:


7. Wrap a small piece of tape around the toothpick just below the center. This creates a "stop" that keeps the bead from sliding down onto your fingers as you paint it. Place the bead on the toothpick:


8. Holding the bead upright, paint one end of the bead with Carbon Black acrylic paint using the 1/8" flat paintbrush. Let dry. Turn the bead over and paint the other end. Let dry.

9. Apply a couple of coats of clear acrylic varnish, allowing each coat to dry thoroughly between applications.


You now have a beautiful hand painted bead, ready to string!

Text and images ©2014 Lynn Edwards